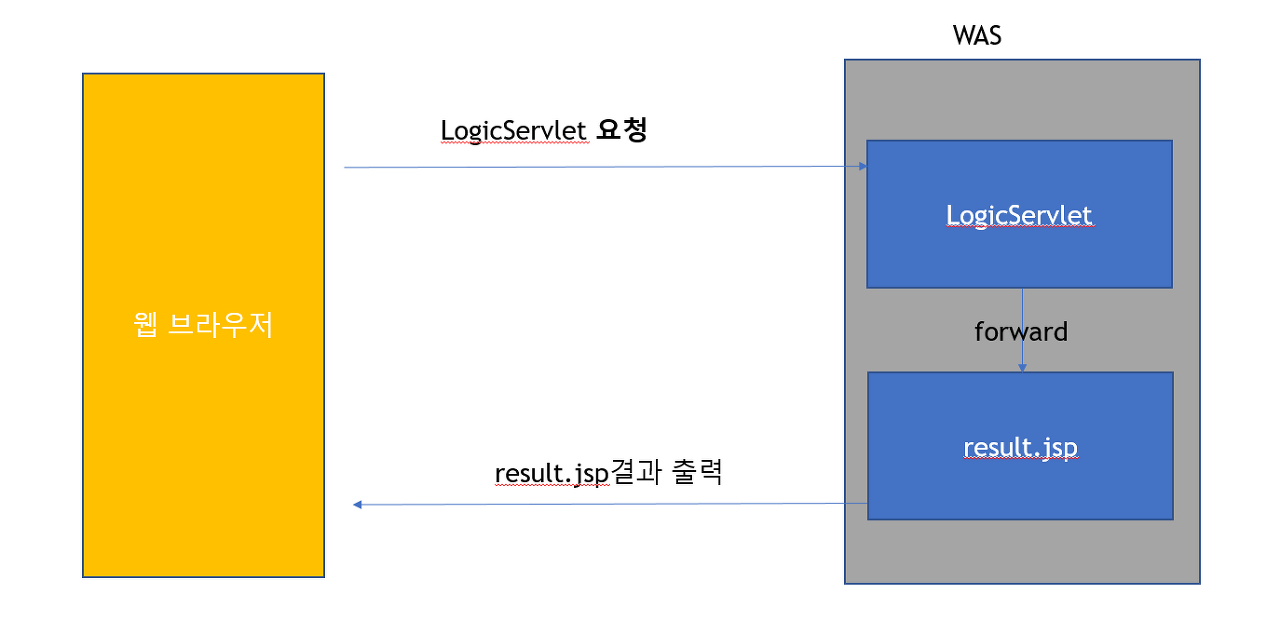
Servlet과 JSP 연동
- Servlet은 프로그램 로직이 수행되기에 유리하다. IDE 등에서 지원을 좀 더 잘해준다.
- JSP는 결과를 출력하기에 Servlet보다 유리하다. 필요한 html문을 그냥 입력하면 된다.
- 프로그램 로직 수행은 Servlet에서, 결과 출력은 JSP에서 하는 것이 유리하다.
- Servlet과 JSP의 장단점을 해결하기 위해서 Servlet에서 프로그램 로직이 수행되고, 그 결과를 JSP에게 포워딩하는 방법이 사용되게 되었다. 이를 Servlet과 JSP 연동이라고 한다.
Servlet과 JSP 연동 실습
Servlet과 JSP를 연동하는 실습을 해보았다.
100이하의 랜덤 숫자 두 개를 더한 결과를 화면에 출력하는 페이지를 구현하는데
비즈니스 로직은 LogicServlet이 수행하고, 수행 결과를 result.jsp로 포워딩해 result.jsp가 출력을 담당하도록 했다.

LogicServlet.java
import java.io.IOException;

import javax.servlet.RequestDispatcher;
import javax.servlet.ServletException;
import javax.servlet.annotation.WebServlet;
import javax.servlet.http.HttpServlet;
import javax.servlet.http.HttpServletRequest;
import javax.servlet.http.HttpServletResponse;

/**
 * Servlet implementation class LogicServlet
 */
@WebServlet("/LogicServlet")
public class LogicServlet extends HttpServlet {
    private static final long serialVersionUID = 1L;

    /**
     * @see HttpServlet#HttpServlet()
     */
    public LogicServlet() {
        super();
        // TODO Auto-generated constructor stub
    }

    /**
     * @see HttpServlet#doGet(HttpServletRequest request, HttpServletResponse response)
     */
    protected void doGet(HttpServletRequest request, HttpServletResponse response) throws ServletException, IOException {
        int v1 = (int)(Math.random() * 100) + 1;
        int v2 = (int)(Math.random() * 100) + 1;
        int result = v1 + v2;

        request.setAttribute("v1", v1);
        request.setAttribute("v2", v2);
        request.setAttribute("result", result);

        RequestDispatcher requestDispatcher = request.getRequestDispatcher("/result.jsp");
        requestDispatcher.forward(request, response);
    }

}
result.jsp
<%@ page language="java" contentType="text/html; charset=UTF-8"
    pageEncoding="UTF-8"%>
<!DOCTYPE html PUBLIC "-//W3C//DTD HTML 4.01 Transitional//EN" "http://www.w3.org/TR/html4/loose.dtd">
<html>
<head>
<meta http-equiv="Content-Type" content="text/html; charset=UTF-8">
<title>Insert title here</title>
</head>
<body>
EL표기법으로 출력합니다.<br>
${v1} + ${v2} = ${result} <br><br>

스클립틀릿과 표현식을 이용해 출력합니다.<br>
<%
    int v1 = (int)request.getAttribute("v1");
    int v2 = (int)request.getAttribute("v2");
    int result = (int)request.getAttribute("result");
%>

<%=v1%> + <%=v2 %> = <%=result %>
</body>
</html>
한편, servlet과 jsp를 연동함으로써 비즈니스 로직을 수행하는 부분과 출력을 담당하는 부분이 분리할 수 있게 되었다. 사실상 jsp가 디자인을 담당하고 있는 것이다. 디자인적인 요소가 더 들어갈 수 있는 부분인데 자꾸만 자바코드가 들어가게 되면 협업을 하게 될 디자이너 등에게 거부감이 들 수 있다. 이러한 자바 코드를 줄이고, 개발자가 아닌 다른 사람이 보았을 때 편하게 할 수 있는 방법을 모색하게 된 결과 EL 표기법, JSTL 등이 등장하게 되었다. 위 예시에 간략히 소개가 되었는데, 한눈에 봐도 jsp 스클립트릿 표현식보다 훨씬 간단하고 직관적이게 구현이 가능하다.
[부스트코스 관련 강의 링크]
servlet & jsp 연동 - https://www.edwith.org/boostcourse-web/lecture/16706/
[LECTURE] 3) servlet & jsp연동 : edwith
들어가기 전에 서블릿과 JSP는 서로 상호 보완적인 관계를 가지고 있습니다. 서블릿은 로직을 구현하기에 알맞지만, HTML을 출력하기엔 불편합니다. JSP는 로직을 구현하는 것은 ... - 부스트코스
www.edwith.org

'Tech > BoostCourse - WEB' 카테고리의 다른 글
| [부스트코스] JSP - EL(Expression Language) (0) | 2020.03.02 |
|---|---|
| [부스트코스] Servlet/JSP - Scope (0) | 2020.03.02 |
| [부스트코스] forward란? (forward와 redirect 차이) (0) | 2020.02.28 |
| [부스트코스] 리다이렉트(redirect)란? (0) | 2020.02.28 |
| [부스트코스] JSP 내장객체(Implicit Objects) (0) | 2020.02.25 |


